Here I extend the API to train on a new object that is not part of the COCO dataset. In this case I chose a toy that was lying around. See gif below. So far, I have been impressed by the performance of the API. The steps highlighted here can be extended to any single or multiple object detector that you want to build.

Tensorflow Toy Detector~
You can find the code on my Github repo
- Collecting data
The first step is collecting images for your project. You could download them from google ensuring you have a wide variation in angles, brightness, scale etc. In my case I created a video of the little aeroplane toy and used Opencv to extract images from the video. This saved me a lot of time. I ensured that images were taken from multiple angles. You can also randomly change brightness for some of the images so that the detector can work under different conditions of lightning. Overall 100–150 pics will suffice. See some sample images below:

PS: Since video was taken from my Iphone, the original images were pretty big — 1920x1090. This would have required a lot of memory so used PIL resize to resize them to 500x300 kind of keeping the aspect ratio.
2. Annotating the images
I used labelimg to annotate the images. This is a very handle tool and annotations are created in the Pascal VOC format which is useful later on. It is written in Python and uses Qt for interface. I used Python3 + Qt5 with no problems. See example of annotated image. Essentially we identify xmin, ymin, xmax and ymax for the object and pass that to the model along with the image for training

3. Creating the TFR datasets
Tensorflow API wants the datasets to be in TFRecord file format. This is probably the trickiest part. However tensorflow has provided a couple of handy scripts to get you started —
create_pascal_tf_record.py and create_pet_tf_record.py. I was able to used the create_pet_tf_record.pywith minimal edits since labelimg already creates annotations in the correct format. I also like that this script randomly takes 30% of the data and creates a validation TFR file.
You will also need to create a label.pbtxt file that is used to convert label name to a numeric id. For my case it was as simple as
item {
 id: 1
 name: ‘toy’
}
I have included the label_map.pbtxt file and the create_pet_tf_records.py file on my github. In case you are getting stuck anywhere, I highly recommend the Oxfort Pets walkthrough provided by Tensorflow.
4. Creating a model config file
Once the TFR datasets are created, then first you need to decide if you will use an existing model and fine tune it or build from scratch. I highly recommend using an existing model since most of the features that are learnt by CNNs are often object agnostic and fine tuning an existing model is usually an easy and accurate process. Please note that if you do decide to build from scratch you will need much more than 150 images and training will take days. The API provides 5 different models that provide a trade off between speed of execution and the accuracy in placing bounding boxes. See table below:
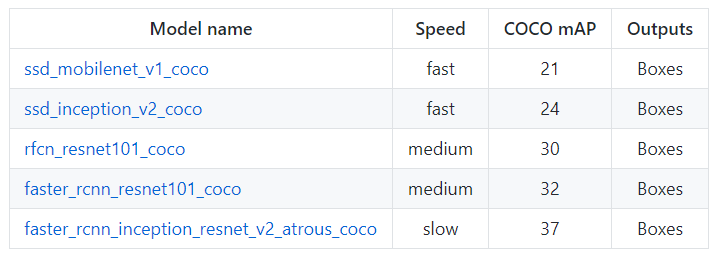
For this project I decided to use the faster_rcnn_resnet101 that was trained on coco dataset. This is a very nice link if you want to learn more about RCNN models.
Tensorflow provides several sample config files to get started. I decided to use the faster_rcnn_resnet101_coco file and updated any paths that need to be configured in the file.Don’t forget to update the num. of classes too.
5. Training the model
Finally! All the hard (and boring) part is done and we can start training the model. Since I have a reasonable GPU, I decided to train locally. However you can train on the cloud. Again tensorflow documentation has made this easy and provided all the steps.
You can start the training job and the evaluation jobs on two separate terminals at the same time. And initiate tensorboard to monitor performance. After training for 2–3 hours, I could see total loss get down to 0.077 and precision up to 0.99. By looking at images in Tensorboard we can see that model becomes accurate fairly quickly.


6. Testing the model
To test the model, we first select a model checkpoint (usually the latest) and export into a frozen inference graph. The script for this is also on my github. I tested the model on a new video recorded on my Iphone. As in my previousarticle, I used the Python moviepy library to parse the video into frames and then run object detector on each frame and collate results back into the video.
Next Steps
Couple of things I noticed and additional explorations for the future
- During testing, I found the Faster RCNN model was a bit slow. Next, I will explore using the fastest model — SSD mobilenet and see if there is a noticeable decrease in accuracy
- For this model, I just used the default parameters in the model config file for faster_rcnn_resnet101_coco. Might be worth exploring if they can be tweaked for a better performance
- With a little more effort, this process can be extended to additional categories
Give me a ❤️ if you liked this post:) Hope you pull the code and try it yourself.
Other writings: https://medium.com/@priya.dwivedi/
PS: I have my own deep learning model building consultancy and love to work on interesting problems. I have helped several startups deploy innovative AI based solutions. If you have a project that we can collaborate on, then please contact me at priya.toronto3@gmail.com
References:
- Google Tensorflow Object Detection Github
- Fantastic article on Medium that gave me inspiration and some useful tips
Comments
Post a Comment